Maximize HMI uptime: A guide to AVEVA™ InTouch HMI redundancy
Posted: September 09, 2025
Introduction
In industrial environments, downtime isn’t just inconvenient. It’s expensive, disruptive, and sometimes even dangerous. What happens if your primary HMI node goes down? In a standalone InTouch setup, redundancy may seem out of reach—but good news: It isn’t.
You can achieve reliable failover in a standalone InTouch application with a simple, smart setup using partner nodes and a few strategic scripts. In this post, we’ll explain why redundancy is worth it and give you a high-level breakdown of how to configure it in your system.
Why set up redundancy in InTouch?
Often, AVEVA InTouch HMI is used to monitor and control critical processes. If your HMI node fails—whether due to a power outage, system crash, or maintenance—you could lose valuable data, alarms, and operator visibility. By setting up a redundancy mechanism:
- Alarms and historical data remain intact, even if one node fails
- Automatic failover minimizes downtime
- Operators and engineers gain peace of mind
How it works: A simple redundant pair
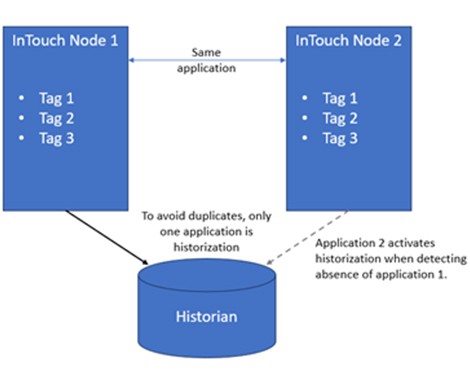
The approach is simple: Configure Node1 and Node2 as partners. Both run the same InTouch application, connect to the same Historian, and use the same external data source. One node actively logs alarms and historical data at a time, while the other stays in standby mode. Here’s the typical sequence:
- Node1 is active — it logs alarms and data.
- Node2 is on standby — the app runs, but logging and alarms are disabled.
- If Node1 goes down, Node2 takes over logging and alarms automatically.
- If Node1 comes back online, it detects Node2 is active—and stays passive.
- If Node2 then goes down, Node1 resumes logging.
Setting up application for testing
Download InTouch free trial
You can download a free AVEVA InTouch Trial by going to the following link:
https://www.aveva.com/en/products/intouch-hmi/
Click the tile that says, “Download software.” This will take you to a page where you can enter your information and get access to a free software trial for AVEVA InTouch.
Note: You will need 3 nodes: InTouchA, InTouchB, and Historian. The System Management Server (SMS) needs to be configured to ensure encrypted communications between the nodes. Set the Historian as the SMS and connect InTouchA and InTouchB to the Historian SMS node.
Download InTouch historical redundancy file
This blog uses a graphic that has been previously created. You can download the HistoricalRedundancy.aaPKG file from our github site:
https://github.com/edeh-1/WonderLAB.
Watch the video on InTouch Redundancy:
https://www.youtube.com/watch?v=TT_lymAzS0c
Step-by-Step Guide for Setting up InTouch Application Redundant Pair and Failover
Configure access names
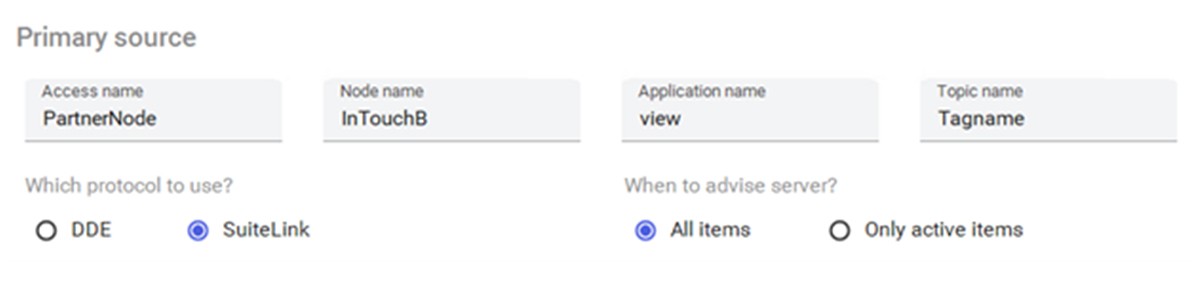
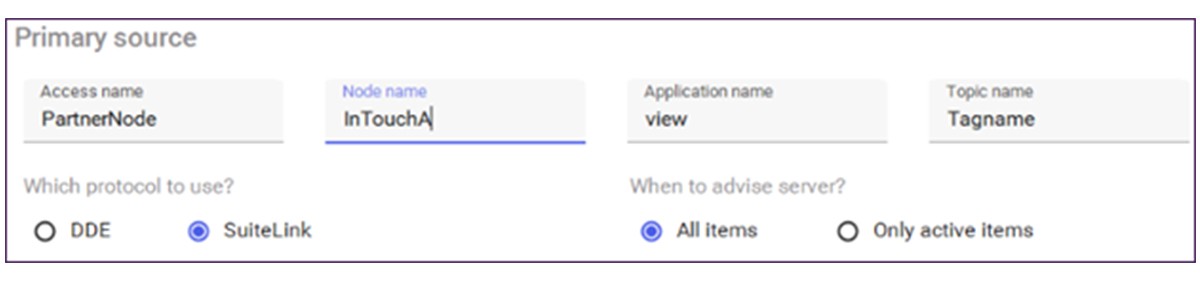
In order for InTouch to communicate with a partner node, your application needs to know how to reach its partner. In WindowMaker, set up an access name in InTouch to reference its partner node. This is a foundational step – without it, the two nodes will not recognize each other in the failover logic. Within your Node1, update the PartnerNode access name with the node name of your Node2 machine.
Note: Make sure that “all items” is selected for “when to advise server?,” so that this access name can be connected.
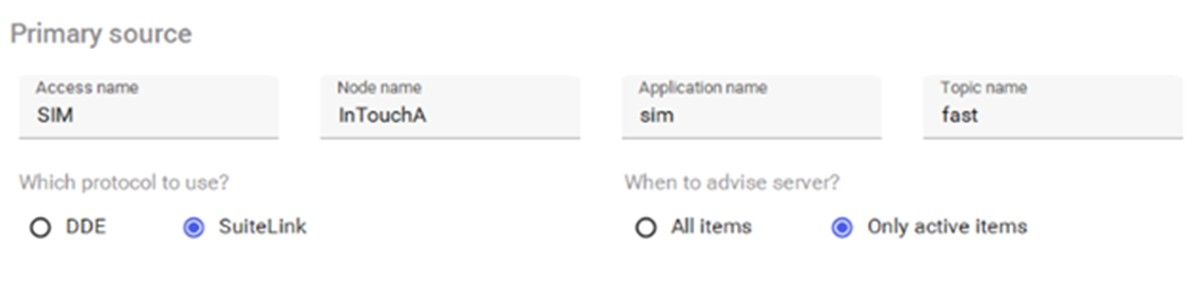
Create an access name that will be used to simulate data for one of the tags we will be using:
Key tags
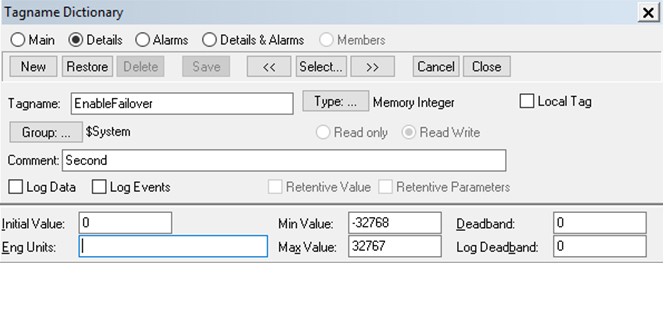
You will use three tags to monitor your partner node’s status and control your primary node’s logging and alarms. These tags will be used for enabling smart failover logic later on. Create these three tags in the InTouch A Node:
1. EnableFailover
Type: Memory Integer
Comment: Second
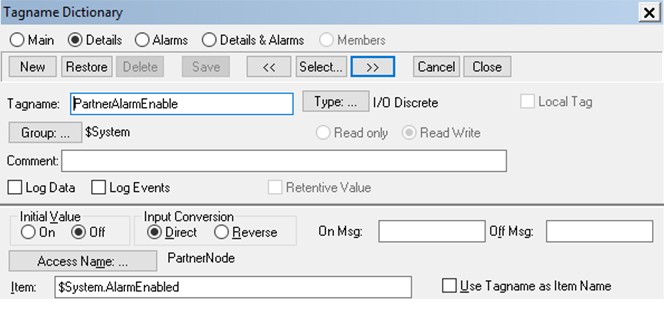
2. PartnerAlarmEnable
Type: I/O Discrete
Access Name: PartnerNode
Item:$System.AlarmEnabled
Note: This indicates the status of if the Node is storing alarms to the AVEVA Historian.
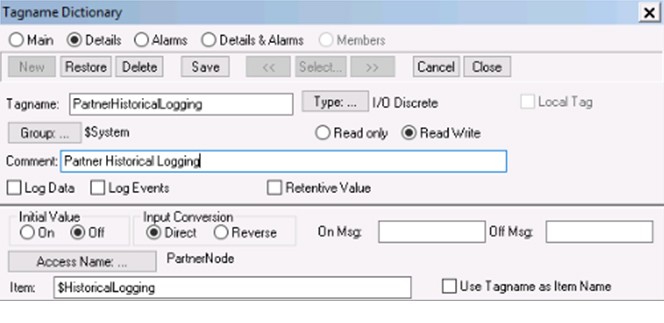
3. PartnerHistoricalLogging
Type: I/O Discrete
Comment: Partner Historical Logging
Access name: PartnerNode
Item: $HistoricalLogging
Note: This indicates if the node is logging historical data to the AVEVA Historian.
Note: The tagname PartnerAlarmEnable and PartnerHistoricalLogging are required so that connection to the PartnerNode access name will be executed. Without these IO tags, the PartnerNode will always be disconnected.
Script smart failover logic
Here’s where the magic happens. With the partner relationship and the tags in place, the script will determine when to activate failover. The script will monitor the partner node’s status and—only when needed—take over logging and alarms. This ensures that no data is lost and that only one node is active at a time.
Three scripts are used: an On Startup Application Script, a While Running Application Script, and a Condition Script.
- On Startup application script sets $HistorialLogging and $System.AlarmEnabled to False.
$HistoricalLogging = 0;
$System.AlarmEnabled = 0;
- While Running application script will increment the EnableFailover tag by 1 every 1000 msec.
EnableFailover = EnableFailover + 1;
- Condition Script implements a failover mechanism to ensure continuous historical logging and alarm monitoring. The script runs every 5 seconds when failover is enabled and checks whether historical logging is active on the current node. If not, it evaluates the status of the partner node. If the partner node is found to be offline—even after attempting to reinitialize the connection—the script activates historical logging and alarm handling locally to maintain data integrity and system awareness during partner node downtime. For the condition script, you can copy and paste the script below:
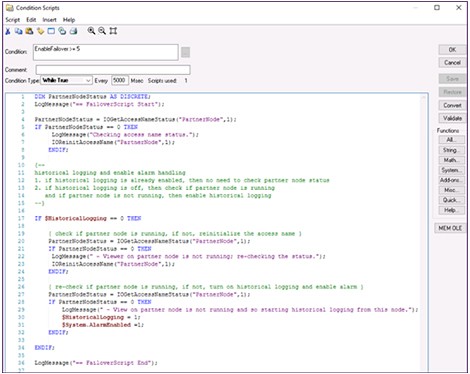
Note: The condition of EnableFailover >= 5 instead of a simple discrete tag is to delay the evaluation of this condition so that the script will run after the PartnerNode access name is attempted to be connected.
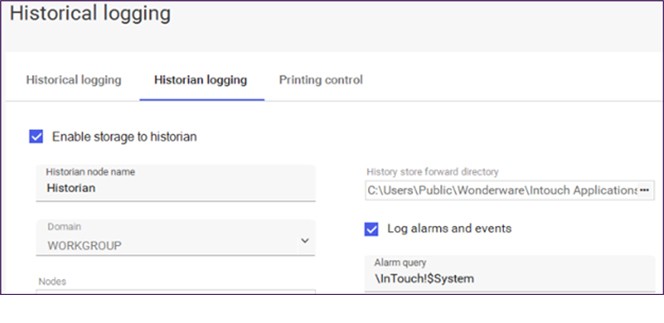
Confirm that InTouch is configured to log to the AVEVA Historian. Update the Historian node name to the node name of your AVEVA Historian.
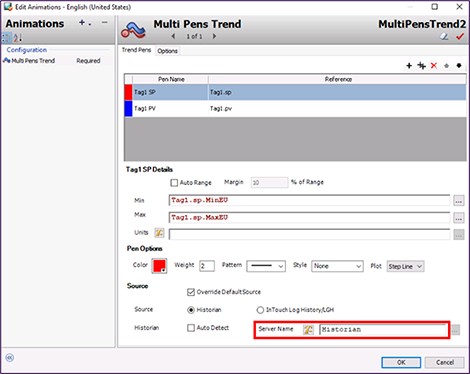
Import the HistoricalRedundancy Industrial Graphic into the InTouchA node. In the HistoricalRedundancy Industrial Graphic, update the trend to point to the Historian node where you are logging the data for both Tag1.pv and Tag1.sp.
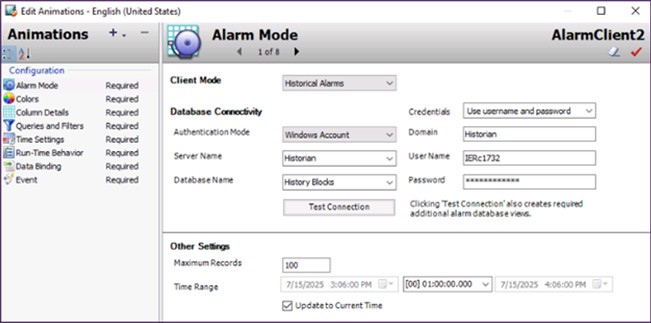
For the Alarm Client, under Alarm Mode, update the Server Name to point to the Historian node and enter the necessary credentials. Test the connection to validate that you are connected to the Historian node.
Save and close the HistoricalRedundancy graphic and then embed into a Frame Window. Save the project.
Then in the InTouchA node, in Application Manager, export the entire InTouch application that was just created.
Mirror the setup on the partner node
Failover works both ways. To make the system truly redundant, you’ll need to mirror everything on the second node. That means the same application, same scripts, same tags – just pointing the other direction.
In the InTouchB node, import the InTouch application and then open WindowMaker.
Update the PartnerNode access name with the Node name of the InTouchA machine.
Test your failover
Now we are going to simulate a node failure and confirm that the partner node takes over in the event of a failover. This is where you validate that redundancy is working exactly as intended.
Final thoughts
Setting up redundancy in standalone InTouch applications is entirely possible—and surprisingly elegant. With just a few configuration tweaks and condition scripts, you can give your system a backup plan that ensures data integrity, alarm continuity, and peace of mind for everyone counting on your HMI.